Tips for A Successful Diesel Fuel Filter Change On A Heavy-Duty Truck
When owning or servicing a diesel vehicle it’s important to recognize how different the engine technology is compared to gasoline-powered vehicles. The differences have a significant impact on the approach to routine diesel engine maintenance such as what oil is used and how frequently filters are changed – especially oil filters, air filters, and fuel filters. Diesel fuel is by nature, quite dirty, so it makes sense that the fuel filter is one of the most important filters on any diesel application. They usually require a change every 10,000 to 15,000 miles whereas a modern gasoline fuel filter could go 100K+ miles before a change is needed – if at all.
Most diesel truck applications will require 2 diesel fuel filters to be serviced. The first is a pre-filter, which is positioned somewhere between the fuel tank and the fuel pump – usually somewhere on the undercarriage along the frame rail. This filter cleans the fuel of any contaminants before it gets to the pump. The secondary filter is usually found in the engine bay under the hood and its purpose is to further clean the fuel of any contaminants before it gets to the injectors.
The following is a very generalized rundown of the process for a successful diesel fuel filter change on a heavy-duty diesel truck. Some aspects may be slightly different depending on your application and we highly recommend that you consult the vehicle’s maintenance manual for any discrepancies.
1.Lift the truck off the ground to get more clearance if necessary
2. Make sure to shut the engine off before performing this service
TIP: Changing a fuel filter can be a somewhat messy task. Minimize the potential mess by positioning an adequately sized drain pan underneath the filter
3. Next, you’ll need to remove a drain plug from the filter housing. You’ll likely need a hex tool or allen wrench to loosen it up.
4. Let the fuel drain out of the fuel line and filter housing
5. Once the fuel has drained into the pan, use a ratchet and socket to loosen the filter cap and remove it from the housing.
6. The dirty fuel filter may come out still attached to the cap or it may remain in the housing. Make sure to remove it and throw it away.
7. Next, remove the old O-ring from the filter cap. You may find that it’s easier to remove with a pry tool or flathead screwdriver.
8. Thoroughly wipe down the filter cap and the sealing surface on the housing. Then, install the O-ring that came with the new filter.
TIP: One of the leading causes of diesel fuel filter leakage is an improperly installed cap O-ring. So, it’s important to make sure that the new O-ring is properly seated against the ridge all the way around the cap.
9. Next, install the new filter into the clean filter cap. It should snap in and fit securely.
10. Then, use a torque wrench to tighten the cap to manufacturer specifications. – Don’t forget to put the drain plug back in!
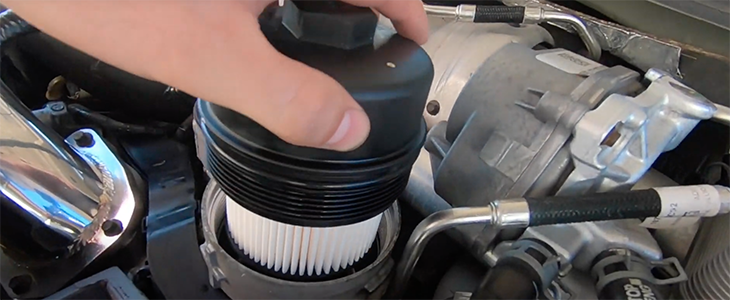
11. To change the second filter, which is usually located under the hood, you may need a square drive or socket to loosen the cap.
12. Once the cap is loosened, remove it by hand, and then pull the dirty filter up out of the housing.
TIP: To avoid making a big mess, slowly lift the cap with the dirty filter still inside and hold it there for a minute to allow the fuel to drain back into the housing.
13. Next, you’ll want to wipe down the filter cap and sealing surface on the housing just like you did for the filter found underneath the truck. Make sure to wipe down the inside of the cap as well as the thread surface.
14. Once again, you’ll need to use either a pry tool or a flathead screwdriver to remove the old O-ring from the cap.
15. As you did for the O-ring on the other filter, make sure to install the new O-ring so that it is properly seated against the ridge all the way around the cap. This will ensure that there are no leaks when the cap is re-installed.
16. Install the new filter into the housing and tighten the cap by hand. Remember, fuel filter leaks can happen as a result of over or under-tightening the cap, so make sure to use a torque wrench to finish tightening the cap to the manufacturer’s exact specifications.
Before driving the truck, you’ll want to bleed any air bubbles and prime the fuel system. This means to purge any air that might have gotten into the system while the filter caps were off and make sure that the fuel system contains nothing but diesel fuel. It’s an important step that will prevent what’s called vapor lock, which is when liquid fuel is converted to gas vapor before it gets to the fuel rail. The diesel fuel priming process will vary from one vehicle to the next, so make sure to follow the maintenance manual for your application.
As we mentioned previously, diesel fuel is a naturally dirty fuel, and a frequent diesel fuel filter change is critically important to the optimal performance and longevity of any diesel engine. Most diesel truck owners use their vehicles to perform critical tasks such as towing, hauling, or plowing. For these drivers, the ways in which a restricted diesel fuel filter will manifest can be particularly inconvenient – including loss of power in uphill driving or situations where the engine is under heavy load, such as towing or hauling heavy cargo.
If you’re interested in seeing a visual demonstration, here’s a video showing the diesel fuel filter change on a 2017-2019 F250 Powerstroke.
Tags: Diesel, diesel engine, Diesel Fuel, Installation Tips, Tech Tips, Turbodiesel, Vapor Lock
Categories: Fuel FiltersShare this entry